How to mock Google Places with Cypress
Netlify Forms are an amazing addition to the static site ecosystem. They’re easy to set up and offer great features like spam protection and submission forwarding to an email of your choice for free!
The GDPR Problem
One thing that kept me up at night about the forms feature was the thought of personally identifiable information (PII) like customer name, email address and telephone number continuing to exist on a Netlify server after the form submission had been forwarded to my email account using Netlify Form notifications. Sure I could manually delete the submissions via the UI after a GDPR retention period but I would much rather deletion was automated.
How to automate form deletion on Netlify?
Enter Netlify Functions. These offer the ability to deploy serverless/lambda functions, which are deployed along with the rest of your Netlify site. The great thing about these is that they abstract away all the under the hood AWS management boredom and offer you a simple way to create and use a lambda function.
Environment variables are available and Netlify offers a generous collection of event-based triggers, which we are going to take advantage of. Specifically submission-created, which will call our lambda function when a user successfully sends a ‘verified’ submission via a form. We’ll also use the Netlify API to do our deleting.
Let’s get started
This guide assumes you already have an existing site deploying to Netlify and have already set up a Netlify Form which is collecting submissions.
Note: When we trigger our function later, it will delete ALL form submssions from ALL forms on your site and it will do this every time a form is submitted on your site. Back submissions up now, if you need to.We’re going to tackle this in 3 parts
- Get a Netlify API Access Token
- Creating the function in your project
- Check that the function deploys and works
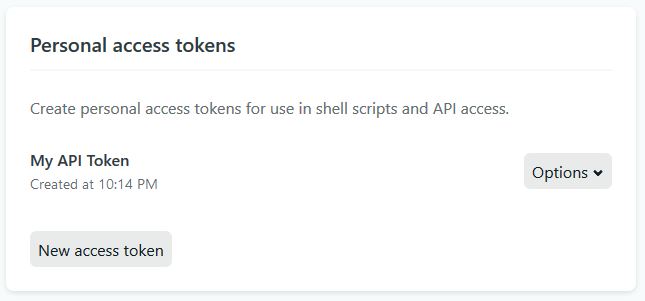
1. Netlify API Access Token
As we’re going to make use of the Netlify API, we’re going to need to get an access token for it and then add that token as a Netlify environment variable.
- Go to https://app.netlify.com/user/applications
- Under the section Personal access tokens, click New access token.
- Give it a name and click Generate token and copy the token somewhere safe.
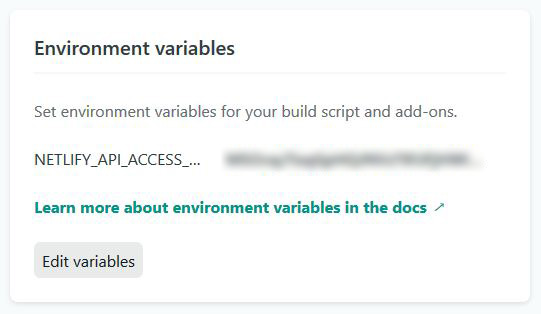
- Next, Log in to your Netlify account and select your site.
- Go to Settings > Build & Deploy > Environment
- Click New variable and name it NETLIFY_API_ACCESS_TOKEN
- Paste the API token as the value and click Save
2. Create the function
Tell Netlify where to find our function
We haven’t created the function yet but in order for Netlify to know where to find our function, we’re going to need to explicitly tell it the location. To do this, we’re going to create a Netlify build config file. If you’re interested, you can read more about File-based configuration here.
- Create a new file in the root of your project and name it
netlify.toml - Paste the following into the file and save it.
[build]
   functions = "functions"
Create the function file
-
Create a new folder in the root of your project and name it functions. This should sound crazily familiar because we just told Netlify the name of this folder in the previous step.
-
Inside our functions folder, create a new file called
submission-created.js. Normally, you can name a function whatever you like but as we want to use an event based trigger, the file must be named the same as event trigger submission-created. See other event triggers. -
Here’s the function code. You can copy-paste it into your
submission-created.jsfile. I won’t tell anyone.
In short, we’re connecting to the Netlify API to first get an array of all submissions from every form on our site. Then we loop through that array, using the API to delete each submission. If you want to delete submissions from only a specific form, you’ll want to refactor the function to integrate listForms and listFormSubmissions instead of listSiteSubmissions.
exports.handler = async function (event, context) { const client = new NetlifyAPI(process.env.NETLIFY_API_ACCESS_TOKEN)
const submissions = await client .listSiteSubmissions({ site_id: process.env.SITE_ID, }) .catch((e) => console.log(‘Error getting submissions’, e))
if (submissions.length) { for (i = 0; i < submissions.length; i++) { await client.deleteSubmission({ submission_id: submissions[i].id }) } return { statusCode: 200, body: ‘Submissions deleted’, } } else { return { statusCode: 200, body: ‘No submissions to delete’, } } }
### Set up our 'netlify' dependency
We're requiring `netlify` as a dependency in line 1 of our code but have yet to install it. Functions live their own little lives and need their own dependencies. Let's take care of that now.

 * Install the `netlify-lambda` package as a dev dependency in your project's main `package.json`. This offers a whole suite of stuff to deploy and test Netlify functions but we'll just use a part of it here.

```bash
yarn add -D netlify-lambda- Add the following command under the “scripts” section of your project’s main
package.json. Netlify will run this during the build to install any function specific dependencies. It will install the dependencies into the folder we designated in thenetlify.tomlfile we created earlier.
"postinstall": "netlify-lambda install"- Finally, create a
package.jsonfile inside our functions folder and paste in the following so that Netlify knows what to install for our function.
{
  "dependencies": {
    "netlify": "^4.3.13"
  }
}
That’s it for the coding part!
3. Test that it works
We’re in the final stretch! Now we need to deploy and test that it’s working. I recommend having a couple of form submissions already sitting in Netlify ready to be deleted by our function. This just makes it easier to see that the function has done it’s thing.
- Commit the changes and push them up to trigger a new build. As of writing this, the
submission-createdevent does not fire on Preview Deploys so you will need to push the changes live and use the live URL to test.
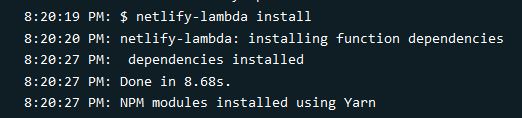
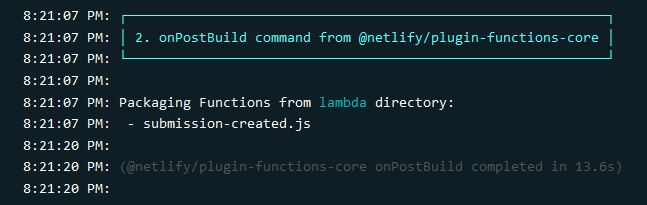
- Open the build log of your new deploy. We’re looking for two things here to confirm that the function has been picked up by Netlify - the function specific dependency was installed and Netlify found the function file. See the screenshots below.
- Once the deploy has completed successfully and deployed live, open up a page on your site with a Netlify form and submit it.
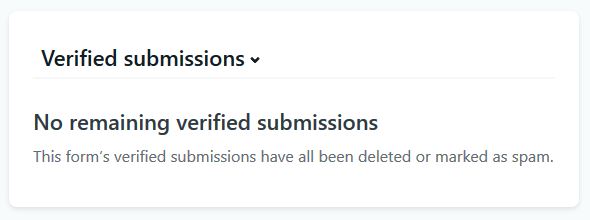
- Go back into the Netlify admin dashboard and to the Forms section.
- Select a form and you shouldn’t see any verified submissions!
Not working?
If you’ve used Netlify Functions before, you’ll know that you can find them under the Functions section of the Netlify dashboard. However, this is not always the case for event based trigger functions. If you’re lucky, the function will show here and you might be able to locate a problem via the logs.
Some other things to check…
- Check that you are testing the function on the live site (not a deploy preview)
- Check that the NETLIFY_API_ACCESS_TOKEN environment variable has been correctly set. If you’re not sure, you’ll have to create a fresh one.
- Check that the
netlify.tomlconfiguration points to the correct location of the function. - Check that the function file is named
submission-created.js - Check that the “postinstall” command is in the right place (under “scripts”) in your project’s main
package.jsonfile.
Still not working?
I’ve created a repo with an example of the setup. It’s using Next.js but the setup should be extremely similar for other jamstack options. You can find it at https://github.com/dazulu/delete-form-submissions-netlify